
System Administration Guide: Security Services
|
|||
|
1. Security Services (Overview) Part II System, File, and Device Security 2. Managing Machine Security (Overview) 3. Controlling Access to Systems (Tasks) 4. Virus Scanning Service (Tasks) 5. Controlling Access to Devices (Tasks) 6. Using the Basic Audit Reporting Tool (Tasks) 7. Controlling Access to Files (Tasks) Part III Roles, Rights Profiles, and Privileges 8. Using Roles and Privileges (Overview) 9. Using Role-Based Access Control (Tasks) 10. Role-Based Access Control (Reference) Part IV Solaris Cryptographic Services 13. Solaris Cryptographic Framework (Overview) 14. Solaris Cryptographic Framework (Tasks) 15. Solaris Key Management Framework Part V Authentication Services and Secure Communication 16. Using Authentication Services (Tasks) 19. Using Solaris Secure Shell (Tasks) Solaris Secure Shell (Overview) Solaris Secure Shell Enhancements in the Solaris 10 Release Solaris Secure Shell (Task Map) Configuring Solaris Secure Shell (Task Map) Configuring Solaris Secure Shell Using Solaris Secure Shell (Task Map) 20. Solaris Secure Shell (Reference) 21. Introduction to the Kerberos Service 22. Planning for the Kerberos Service 23. Configuring the Kerberos Service (Tasks) 24. Kerberos Error Messages and Troubleshooting 25. Administering Kerberos Principals and Policies (Tasks) 26. Using Kerberos Applications (Tasks) 27. The Kerberos Service (Reference) 28. Solaris Auditing (Overview) 29. Planning for Solaris Auditing 30. Managing Solaris Auditing (Tasks) |
Using Solaris Secure ShellSolaris Secure Shell provides secure access between a local shell and a remote shell. For more information, see the ssh_config(4) and ssh(1) man pages. How to Generate a Public/Private Key Pair for Use With Solaris Secure ShellUsers must generate a public/private key pair when their site implements host-based authentication or user public-key authentication. For additional options, see the ssh-keygen(1) man page. Before You BeginDetermine from your system administrator if host-based authentication is configured.
Example 19-2 Establishing a v1 RSA Key for a UserIn the following example, the user can contact hosts that run v1 of the Solaris Secure Shell protocol. To be authenticated by v1 hosts, the user creates a v1 key, then copies the public key portion to the remote host. myLocalHost% ssh-keygen -t rsa1 -f /home/jdoe/.ssh/identity Generating public/private rsa key pair. … Enter passphrase (empty for no passphrase): <Type passphrase> Enter same passphrase again: <Type passphrase> Your identification has been saved in /home/jdoe/.ssh/identity. Your public key has been saved in /home/jdoe/.ssh/identity.pub. The key fingerprint is: … myLocalHost% ls ~/.ssh id_rsa id_rsa.pub identity identity.pub myLocalHost% cat $HOME/.ssh/identity.pub | ssh myRemoteHost \ 'cat >> .ssh/authorized_keys && echo "Key copied"' How to Change the Passphrase for a Solaris Secure Shell Private KeyThe following procedure does not change the private key. The procedure changes the authentication mechanism for the private key, the passphrase. For more information, see the ssh-keygen(1) man page.
How to Log In to a Remote Host With Solaris Secure Shell
How to Reduce Password Prompts in Solaris Secure ShellIf you do not want to type your passphrase and your password to use Solaris Secure Shell, you can use the agent daemon. Start the daemon at the beginning of the session. Then, store your private keys with the agent daemon by using the ssh-add command. If you have different accounts on different hosts, add the keys that you need for the session. You can start the agent daemon manually when needed, as described in the following procedure. Or, you can set the agent daemon to run automatically at the start of every session as described in How to Set Up the ssh-agent Command to Run Automatically in CDE.
Example 19-3 Using ssh-add OptionsIn this example, jdoe adds two keys to the agent daemon. The -l option is used to list all keys that are stored in the daemon. At the end of the session, the -D option is used to remove all the keys from the agent daemon. myLocalHost% ssh-agent myLocalHost% ssh-add Enter passphrase for /home/jdoe/.ssh/id_rsa: <Type passphrase> Identity added: /home/jdoe/.ssh/id_rsa(/home/jdoe/.ssh/id_rsa) myLocalHost% ssh-add /home/jdoe/.ssh/id_dsa Enter passphrase for /home/jdoe/.ssh/id_dsa: <Type passphrase> Identity added: /home/jdoe/.ssh/id_dsa(/home/jdoe/.ssh/id_dsa) myLocalHost% ssh-add -l md5 1024 0e:fb:3d:53:71:77:bf:57:b8:eb:f7:a7:aa:df:e0:d1 /home/jdoe/.ssh/id_rsa(RSA) md5 1024 c1:d3:21:5e:40:60:c5:73:d8:87:09:3a:fa:5f:32:53 /home/jdoe/.ssh/id_dsa(DSA) User conducts Solaris Secure Shell transactions myLocalHost% ssh-add -D Identity removed: /home/jdoe/.ssh/id_rsa(/home/jdoe/.ssh/id_rsa.pub) /home/jdoe/.ssh/id_dsa(DSA) How to Set Up the ssh-agent Command to Run Automatically in CDEIf you use CDE, you can avoid providing your passphrase and password whenever you use Solaris Secure Shell by automatically starting an agent daemon, ssh-agent. You can start the agent daemon from the .dtprofile script. To add your passphrase and password to the agent daemon, see Example 19-3. Caution - If you use the Sun JavaTM Desktop System (Java DS), do not set up the ssh-agent command to run automatically. Because the killing of the ssh-agent process is controlled by a CDE interface, when you exit the Java DS, the daemon continues to run. For example, if you start the daemon in a CDE session, move to a Java DS session, and then log out, the daemon continues to run. A running daemon uses system resources. Although no known issues are associated with leaving the ssh-agent daemon running, the daemon contains a password, which could create a security risk.
How to Use Port Forwarding in Solaris Secure ShellYou can specify that a local port be forwarded to a remote host. Effectively, a socket is allocated to listen to the port on the local side. The connection from this port is made over a secure channel to the remote host. For example, you might specify port 143 to obtain email remotely with IMAP4. Similarly, a port can be specified on the remote side. Before You BeginTo use port forwarding, the administrator must have enabled port forwarding on the remote Solaris Secure Shell server. For details, see How to Configure Port Forwarding in Solaris Secure Shell.
Example 19-4 Using Local Port Forwarding to Receive MailThe following example demonstrates how you can use local port forwarding to receive mail securely from a remote server. myLocalHost% ssh -L 9143:myRemoteHost:143 myRemoteHost This command forwards connections from port 9143 on myLocalHost to port 143. Port 143 is the IMAP v2 server port on myRemoteHost. When the user launches a mail application, the user needs to specify the local port number, as shown in the following dialog box. 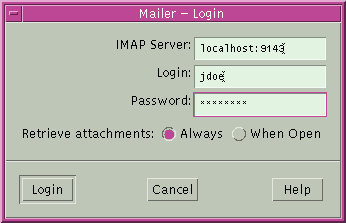 Do not confuse localhost in the dialog box with myLocalHost. myLocalHost is a hypothetical host name. localhost is a keyword that identifies your local system. Example 19-5 Using Remote Port Forwarding to Communicate Outside of a FirewallThis example demonstrates how a user in an enterprise environment can forward connections from a host on an external network to a host inside a corporate firewall. myLocalHost% ssh -R 9022:myLocalHost:22 myOutsideHost This command forwards connections from port 9022 on myOutsideHost to port 22, the sshd server, on the local host. myOutsideHost% ssh -p 9022 localhost myLocalHost% How to Copy Files With Solaris Secure ShellThe following procedure shows how to use the scp command to copy encrypted files between hosts. You can copy encrypted files either between a local host and a remote host, or between two remote hosts. The command operates similarly to the rcp command, except that the scp command prompts for authentication. For more information, see the scp(1) man page. You can also use the sftp, a more secure form of the ftp command. For more information, see the sftp(1) man page. For an example, see Example 19-6.
Example 19-6 Specifying a Port When Using the sftp CommandIn this example, the user wants the sftp command to use a specific port. The user uses the -o option to specify the port. % sftp -o port=2222 guest@RemoteFileServer How to Set Up Default Connections to Hosts Outside a FirewallYou can use Solaris Secure Shell to make a connection from a host inside a firewall to a host outside the firewall. This task is done by specifying a proxy command for ssh either in a configuration file or as an option on the command line. For the command-line option, see Example 19-7. In general, you can customize your ssh interactions through a configuration file.
The files can be customized with two types of proxy commands. One proxy command is for HTTP connections. The other proxy command is for SOCKS5 connections. For more information, see the ssh_config(4) man page.
Example 19-7 Connecting to Hosts Outside a Firewall From the Command LineHow to Set Up Default Connections to Hosts Outside a Firewall explains how to specify a proxy command in a configuration file. In this example, a proxy command is specified on the ssh command line. % ssh -o'Proxycommand=/usr/lib/ssh/ssh-http-proxy-connect \ -h myProxyServer -p 8080 myOutsideHost 22' myOutsideHost The -o option to the ssh command provides a command-line method of specifying a proxy command. This example command does the following:
|
||
|